【WebRTC】ビデオチャットを作れるWebRTCを触ってみた②(実装)
スポンサーリンク
今回はSkyWay × WebRTCでビデオチャットを作ってみたいと思います。
まず、ローカル環境で動かしたいので、XAMPPを使います。
XAMPPのインストール手順はこちらから。
XAMPPのhtdocs配下に「demo-rtc」というディレクトリを作成しました。
C:\xampp\htdocs\demo-rtc
これでブラウザ上から「localhost/demo-rtc/」でアクセスできるようになります。
demo-rtcに以下のhtml、jsファイルを置きます。
※style.cssも読み込まないといけないのですが、今回はcssの中身は省略します。
index.html
ビデオを表示する領域などを確保します。
<!DOCTYPE html>
<html>
<head lang="ja">
    <meta http-equiv="Content-Type" content="text/html; charset=utf-8"/>
    <title>TksLab Video Chat</title>
    <link rel="stylesheet" href="style.css">
</head>
<div class="pure-g">

    <!-- Video area -->
    <div class="pure-u-2-3" id="video-container">
        <video id="other-video" autoplay></video>
        <video id="my-video" muted="true" autoplay></video>
    </div>

    <!-- Steps -->
    <div class="pure-u-1-3">
        <h2>TksLab Video Chat</h2>

        <p>私のID: <span id="my-id">...</span></p>
        <form id="make-call" class="pure-form">
            <input type="text" placeholder="相手のIDを入力してください。" id="callto-id">
            <button href="#" class="pure-button pure-button-success" type="submit">通話</button>
        </form>
        <form id="end-call" class="pure-form">
            <p>相手のID <span id="other-id">...</span></p>
            <button href="#" class="pure-button pure-button-success" type="submit">通話終了</button
        </form>
    </div>
</div>
<script type="text/javascript" src="https://code.jquery.com/jquery-3.2.1.min.js"></script>
<script type="text/javascript" src="https://cdn.webrtc.ecl.ntt.com/skyway-latest.js"></script>
<script type="text/javascript" src="script.js"></script>
</html>
script.js
javascriptがメインって感じですね。
'use strict';

let localStream = null;
let peer = null;
let existingCall = null;

// getUserMediaでデバイス情報を取得する。
navigator.mediaDevices.getUserMedia({video: true, audio: true})
    .then(function (stream) {
        // Success
        $('#my-video').get(0).srcObject = stream;
        localStream = stream;
    }).catch(function (error) {
    // Error
    console.error('mediaDevice.getUserMedia() error:', error);
    return;
});

// Peerオブジェクトの作成。APIキーを指定する。
peer = new Peer({
    key: 'xxxxxxxxxxxxxxxxxxxxxxxxxxx',
    debug: 3
});

// Peer Openイベント
peer.on('open', function(){
    $('#my-id').text(peer.id);
});

// Peer Errorイベント
peer.on('error', function(err){
    alert(err.message);
});

// Peer Closeイベント
peer.on('close', function(){
});

// Peer 切断イベント
peer.on('disconnected', function(){
});

// 通話押下
$('#make-call').submit(function(e){
    e.preventDefault();
    // 相手のIDにローカルストリームを送る
    const call = peer.call($('#callto-id').val(), localStream);
    setupCallEventHandlers(call);
});

// 通話終了
$('#end-call').click(function(){
    existingCall.close();
});

// 着信が来た時の処理
peer.on('call', function(call){
	// ローカルストリームを返す
    call.answer(localStream);
    // 着信元の状態イベントハンドラ
    setupCallEventHandlers(call);
});

// 着信元の状態イベントハンドラ
function setupCallEventHandlers(call){
	// 着信済みだったらクローズ
    if (existingCall) {
        existingCall.close();
    };

    existingCall = call;

	// ストリームが来たらビデオ表示
    call.on('stream', function(stream){
        addVideo(call,stream);
        setupEndCallUI();
        $('#other-id').text(call.remoteId);
    });
    // 切れたらビデオ削除
    call.on('close', function(){
        removeVideo(call.remoteId);
        setupMakeCallUI();
    });
}

// ビデオ表示
function addVideo(call,stream){
    $('#other-video').get(0).srcObject = stream;
}

// ビデオ削除
function removeVideo(peerId){
    $('#'+peerId).remove();
}

// 初期UI表示
function setupMakeCallUI(){
    $('#make-call').show();
    $('#end-call').hide();
}

// 通話中UI表示
function setupEndCallUI() {
    $('#make-call').hide();
    $('#end-call').show();
}
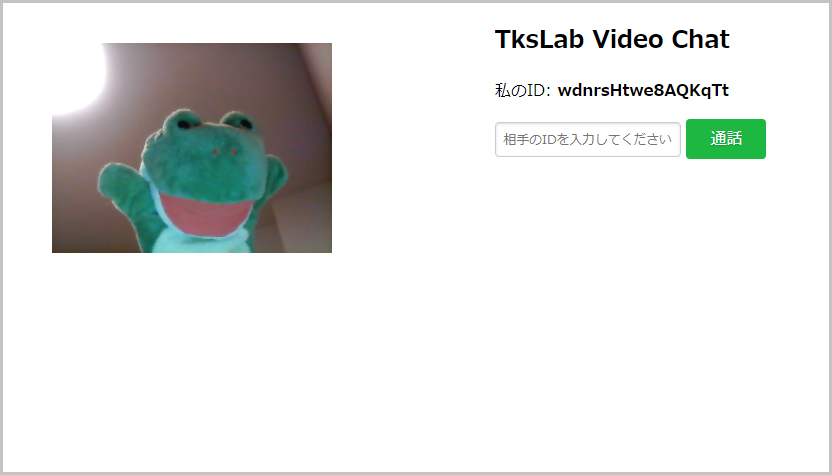
待機画面
相手のIDを入力して通話をかけます。

通話中画面
相手の映像も表示されるようになりました。
※同じPCで開いた画像になってしまいましたが、別PC同士でも問題ありませんでした。

こんな感じで簡単に実装できました。
何かのシステムに組み込みたいですね。
そのうち考えます。